Huayna Potosí Climb: Your First 6,000m Peak – Preparation & Risks
Huayna Potosí ascent: 6,088m in 2 days - The complete guide [2026]
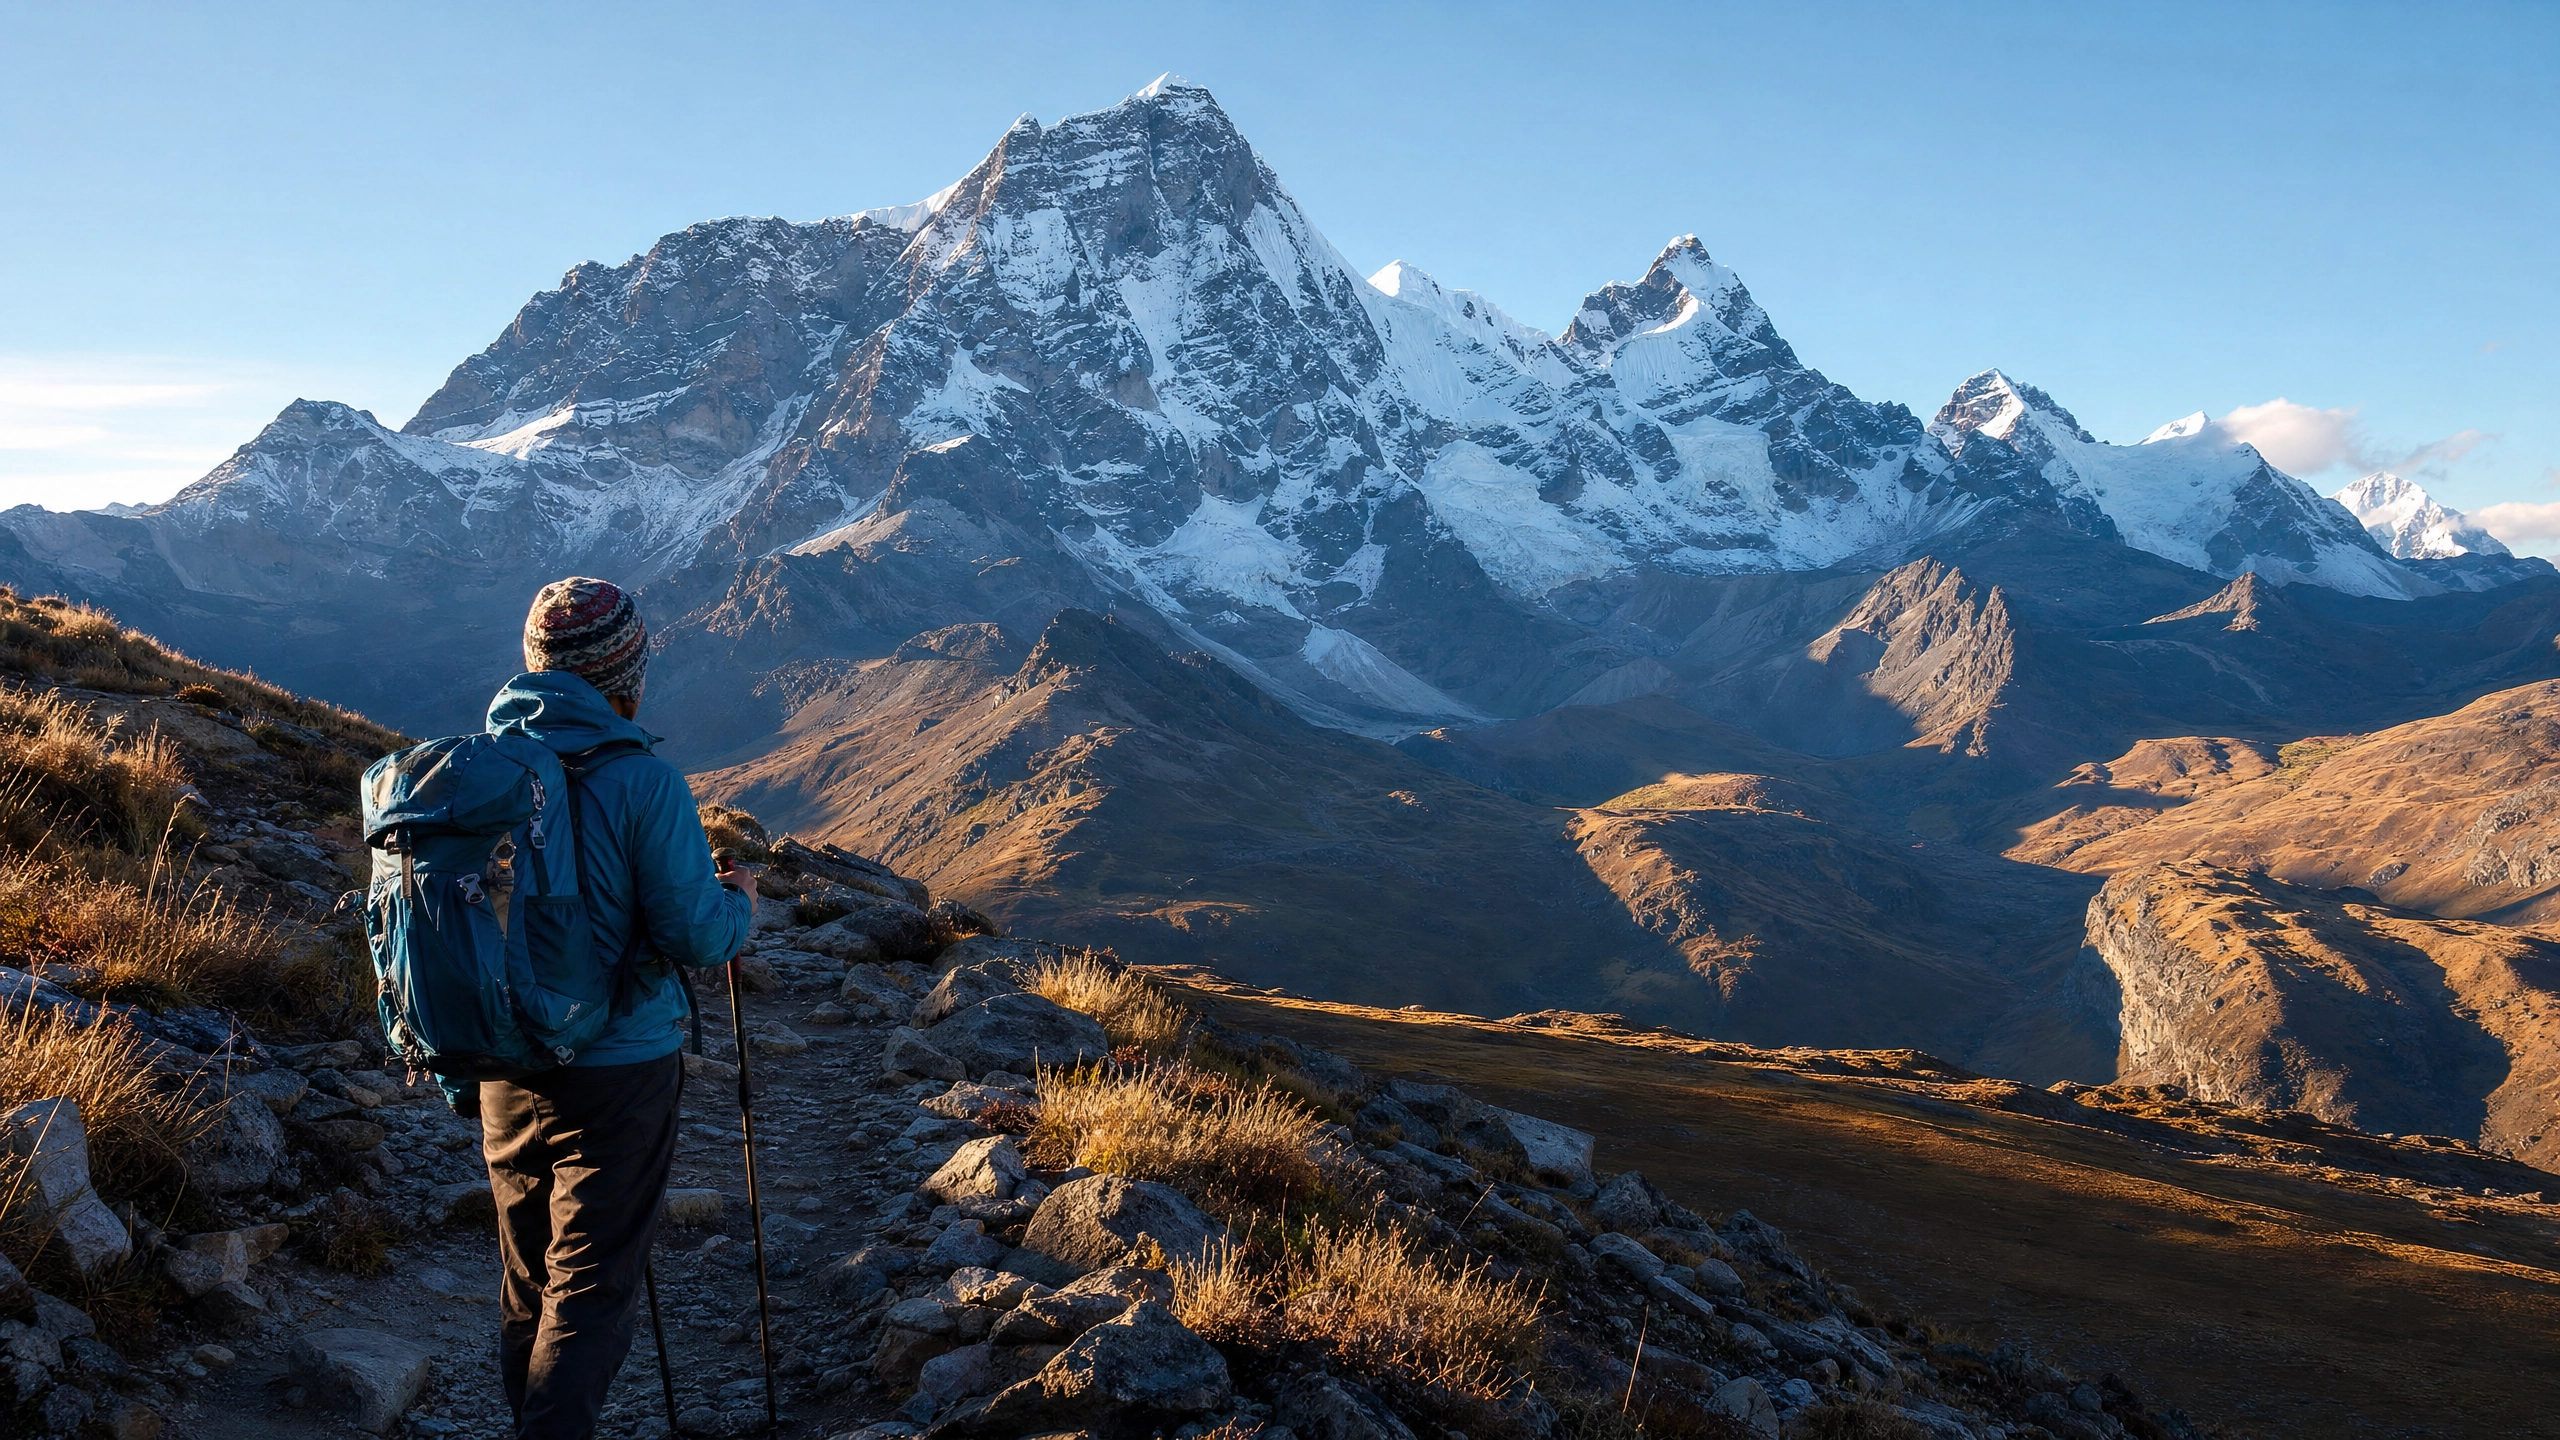
Huayna Potosí (6,088m) is the perfect introduction to high-altitude mountaineering. Despite its impressive height, this mountain is considered the most accessible 6,000m peak in the world - only 1.5 hours from La Paz, technically undemanding and can be climbed in just 2-3 days. No wonder this summit is on the bucket list of many mountaineers.
But beware: "accessible" does not mean "easy". The altitude is brutal, the cold is extreme and the thin air makes every step a challenge. As a German-speaking guide who has been organizing Huayna Potosí tours for years and has stood on the summit several times myself, I know the challenges first-hand.
In this comprehensive guide, you will learn everything you need to know for a successful ascent: from acclimatization and equipment to a detailed daily schedule. I'll show you how to maximize your chances of a successful summit - and how to avoid the most common mistakes I see unprepared climbers make time and time again.
Quick overview: Huayna Potosí at a glance
Altitude: 6,088m
Duration: 2-3 days (3 days recommended)
Difficulty: Medium (non-technical, but very strenuous)
Best time: May-September (dry season)
Cost: 150-250 USD (guide, equipment, transportation, food)
Start: La Paz (3,640m)
Acclimatization: At least 3-4 days in La Paz beforehand!
Success rate: 70-80% (with good preparation)
Technical difficulty: Easy (crampons, ice axe, rope protection)
Physical demands: High (6-8 hours summit ascent)
Why Huayna Potosí? The most accessible 6,000 meter peak in the world
Huayna Potosí is unique. No other 6,000-meter peak in the world is so easily accessible:
Accessibility: Only 1.5 hours drive from La Paz (3,640m) to base camp (4,700m). No days of walking, no complicated logistics. You can have breakfast in La Paz in the morning and be on the mountain by lunchtime.
Technical simplicity: The normal route requires no advanced climbing or ice techniques. If you can walk with crampons and hold an ice axe, you have the technical requirements.
Short duration: From base camp to summit and back in just 2-3 days. Perfect for travelers with limited time.
Affordability: At 150-250 USD, a guided tour costs a fraction of comparable mountains in Nepal or the Alps.
Glacier experience: You gain real high mountain experience - glacier hiking, crampons, rope safety, high altitude acclimatization. Perfect preparation for larger expeditions.
But don't be fooled by the "accessibility": The altitude makes this mountain a serious challenge. Around 20-30% of climbers fail to reach the summit - mostly due to altitude sickness or lack of acclimatization.
The two routes: Normal Route vs. French Route
There are two main routes to the summit:
Normal Route (Recommended)
Difficulty: Medium
Technical requirement: Low
Ascent: Maximum 45-50 degrees
Duration: 6-8 hours to the summit
The normal route is the standard route and the right choice for 95% of climbers. It runs along the north-west ridge and is technically easy - no steep ice walls, no exposed climbing passages. Most of the time you simply walk steeply uphill in the snow, secured by a rope.
Why this route?
- Perfect for beginners
- High success rate
- Well trodden and marked
- Fewer objective dangers (avalanches, icefall)
French Route (only for experienced climbers)
Difficulty: Difficult
Technical requirement: High
Ascent: Up to 60-70 degrees
Duration: 8-10 hours to the summit
The French Route is much more demanding and leads over a steep ice wall on the south side. This route is only suitable for experienced mountaineers with solid ice climbing skills.
My tip: If you have to ask yourself which route is the right one, the answer is always the normal route. The French Route is for climbers who have already done several technical ice tours and are looking for a new challenge.
Acclimatization: The key to success
The altitude is the biggest challenge on the Huayna Potosí. Not the technique, not the fitness - but the thin air at 6,000 meters.
Why acclimatization is so important
At 6,088 meters, only 50% of the oxygen you have at sea level is available. Your body has to adapt: produce more red blood cells, increase your breathing rate, speed up your heartbeat. This takes several days.
Without acclimatization you risk:
- Acute altitude sickness (AMS): Headache, nausea, dizziness
- High altitude pulmonary edema (HAPE):** Fluid in the lungs, life-threatening
- High altitude cerebral edema (HACE):** Swelling of the brain, life-threatening
The perfect acclimatization plan
Minimum (3-4 days):
- Day 1-2: Arrival in La Paz (3,640m), rest, drink a lot, coca tea
- Day 3:** Acclimatization hike to 4,500-5,000m (e.g. Pico Austria 5,350m)
- Day 4:** Rest day, final preparations
- Day 5:** Start of the Huayna Potosí tour
Optimal (5-7 days):
- Day 1-3: La Paz, slow acclimatization
- Day 4:** Day hike to 4,500m (e.g. Chacaltaya 5,395m)
- Day 5:** Rest day
- Day 6:** Day hike to 5,000m+ (e.g. Pico Austria 5,350m)
- Day 7:** Rest day
- Day 8:** Start of the Huayna Potosí tour
My tip: I always see climbers who start the tour directly from the plane and then have to turn back on the summit day. Don't skimp on acclimatization! Every additional day in La Paz increases your chances of reaching the summit by 10-15%.
The 3-day tour: day by day
The standard tour lasts 3 days / 2 nights. There is also a 2-day variant, but I strongly advise against it - the acclimatization is too short.
Day 1: La Paz → Base camp (4,700m) → Glacier training
Procedure:
- 09:00 am: Departure from La Paz
- 10:30 am: Arrival at base camp (4,700m), lunch
- 14:00: Glacier training (2-3 hours)
- 17:00: Return to base camp, dinner
- 20:00: Early night
**Glacier training
In the afternoon you will hike with your guide to a nearby glacier. Here you will learn
- Put on crampons and walk with them
- How to hold and use an ice axe correctly
- Walking secured on a rope
- Self-belaying and fall exercises
- Optional: ice wall climbing (for the photo!)
Important: Many photos of Huayna Potosí show climbers on a steep ice wall. This is NOT the summit route - this is just the training! The actual normal route has no vertical ice wall.
Accommodation: Simple mountain hut with dormitories (10-15 beds), mattresses available, own sleeping bag required. No showers, simple toilets.
My tip: Use the afternoon to get used to the altitude. Drink plenty of water (3-4 liters), eat lightly and go to bed early. The next two days will be tough.
Day 2: Base camp (4,700m) → High camp (5,200m)
Procedure:
- 08:00 am: Breakfast
- 09:00 am: Ascent to high camp (3-4 hours)
- 13:00: Arrival at high camp, lunch
- 14:00-17:00: Rest, prepare equipment
- 18:00: Early dinner
- 19:00: Go to sleep (summit ascent starts at 1-2 o'clock at night!)
The ascent:
500 vertical meters in 3-4 hours doesn't sound like much - but at 5,000m it's brutal. The path is steep, with lots of hairpin bends, sometimes in the snow. You carry all your luggage (approx. 15-20kg): sleeping bag, warm clothing, climbing equipment, water, snacks.
Option: Book a porter (150 BOB / ~20 USD): Many mountaineers book a porter for their luggage. There's no shame in that - it saves energy for the summit day! Women and lighter people in particular benefit from this.
Accommodation: Even simpler hut than at base camp. Cold (down to -15°C at night), windy, cramped. Sleeping is difficult because of the altitude.
My tip: Eat and drink as much as you can, even if you have no appetite. Your body needs energy for the summit day. Prepare your equipment in the afternoon - you don't want to be searching for your gloves in the dark at 1am.
Day 3: Summit day! High camp (5,200m) → Summit (6,088m) → La Paz
Procedure:
- 01:00-02:00: Wake up, breakfast (tea, cookies)
- 02:00: Start of the ascent to the summit
- 07:00-08:00: Summit! (6-8 hours ascent)
- 08:30 am: Start of the descent
- 11:00 am: Back at the high camp, short break
- 12:00: Descent to base camp
- 14:00: Lunch at base camp
- 15:00 hrs: Return to La Paz
- 17:00 hrs: Arrival in La Paz
**The summit ascent
This is the hardest day. 6-8 hours of climbing in the dark, at -20°C, at an altitude of over 6,000m.
Phase 1 (5,200m - 5,800m, 2-3 hours):
Moderate gradient, well-trodden path. You walk secured by a rope, in a group of three (guide + 2 climbers). Slow, steady pace.
Phase 2 (5,800m - 6,088m, 3-4 hours):
Steeper, more strenuous, slightly more technically demanding. Some short passages with 50-60 degree gradients. This is where it is decided who reaches the summit.
Sunrise (~6,500m):
If all goes well, you will experience the sunrise at around 6,500m - a magical moment! The Cordillera Real glows golden and you can see the summit in front of you.
Summit (6,088m):
After 6-8 hours you reach the summit - a narrow snow ridge with spectacular views. Time for photos: 10-15 minutes. Then descend immediately!
Why back so early?
The sun warms the snow and the ice becomes unstable. The risk of avalanches increases after 8-9 am. That's why you have to be at the summit by 7 a.m. at the latest - otherwise the guide will turn back.
The descent:
3-4 hours back to high camp, short break, then another 2 hours to base camp. A total of 12-14 hours on the way. You will be completely exhausted at the end.
My tip: The summit day is a mental marathon. The first 4 hours are in the dark - all you see is the beam of your headlamp and the feet in front of you. That's good! You can't see how steep it is. Concentrate on every single step, breathe deeply and don't think about the summit. Just keep going.
Costs: How much does the Huayna Potosí ascent cost?
The costs are very manageable - especially compared to other 6,000-metre peaks around the world.
Guided 3-day tour: 150-250 USD
Included:
- Experienced mountain guide (1 guide for 2-3 climbers)
- Complete technical equipment (crampons, ice axe, harness, helmet, rope)
- Sleeping bag (-15°C)
- Transportation La Paz - base camp - La Paz
- All meals during the tour
- Accommodation (base camp + high camp)
Not included:
- Park entrance fee (50 BOB / ~7 USD)
- Porter for luggage (150 BOB / ~20 USD, optional)
- Tip for guide (50-100 BOB / ~7-14 USD)
- Personal equipment (clothing, backpack, etc.)
Where to book?
In La Paz (recommended):
Most agencies are located on Sagárnaga Street in the center of La Paz. Just walk by, compare prices and book 1-2 days before the tour.
Recommended agencies:
- Bolivian Mountain Guides (professional, experienced)
- Huayna Potosi Mountain Guides (cheap, good)
- Illimani Mountain Tours (popular with backpackers)
Online (more expensive):
You can also book online, but the prices are 30-50% higher than on site.
My tip: Book locally in La Paz. The prices are lower, you can meet the guide in person, and you have flexibility with the dates. Compare 2-3 agencies, ask about the group size (max. 6 people per guide is ideal), and check the equipment.
Equipment: What you need
Ready for your Bolivia adventure?
Let's plan your perfect private tour together!
The technical equipment is provided, but you need the right clothing!
Provided by the agency:
- Crampons
- ice axe
- Climbing harness
- helmet
- rope
- Sleeping bag (-15°C)
What you need to bring yourself:
Clothing (onion principle!):
- Thermal underwear (merino, 2 sets)
- Fleece or softshell jacket
- Warm down jacket (down to -20°C)
- Waterproof hardshell jacket
- Waterproof trousers
- Warm trekking trousers
- Thick gloves (2 pairs: thin + thick)
- Warm hat (cover your ears!)
- Buff or balaclava
- Warm socks (merino, 3 pairs)
Footwear:
- Sturdy mountain boots (waterproof, insulated, crampon proof!)
- Trekking shoes for day 1-2
- Warm hut shoes
Other:
- Backpack (40-50 liters)
- Headlamp with spare batteries
- Sunglasses (category 4, UV protection!)
- Sun cream (SPF 50+)
- Lip balm with UV protection
- Drinking bottle or thermos flask (1-2 liters)
- Snacks (energy bars, chocolate, nuts)
- Altitude sickness medication (Diamox, Ibuprofen)
- Personal medication
- Camera (cell phone is sufficient, but cold!)
My tip: The cold is brutal! At 6,000m with -20°C and wind it feels like -40°C. Invest in good gloves (preferably 2 pairs on top of each other) and a warm down jacket. I've seen climbers who have had to turn back because of frozen fingers.
Altitude sickness: symptoms, prevention, treatment
Altitude sickness is the main reason why mountaineers fail to reach the summit.
Symptoms
Mild altitude sickness (AMS):
- Headache
- nausea
- Loss of appetite
- fatigue
- dizziness
- insomnia
Severe altitude sickness (HAPE/HACE):
- Severe shortness of breath (even at rest)
- Cough with bloody sputum
- Extreme exhaustion
- Confusion, coordination problems
- Loss of consciousness
Important: HAPE and HACE are life-threatening! Dismount immediately!
Prevention
- Acclimatization: 3-4 days in La Paz before the tour
- Climb slowly:** "Climb high, sleep low"
- Drink a lot: 4-5 liters of water per day
- Coca tea:** Really helps! Drink several times a day
- Diamox:** Prophylactic intake (125-250mg, 2x daily, discuss with doctor)
- Eat light:** No heavy meals
- Avoid alcohol: Exacerbates symptoms
- Slow pace: Don't rush!
Treatment
For mild symptoms:
- Take a break, do not continue to climb
- Drink a lot
- Coca tea
- Ibuprofen for headaches
- Breathe deeply and slowly
For moderate symptoms:
- Do not ascend any further
- Descend 200-300m if necessary
- Take Diamox (if not already prophylactically)
- Observe: Is it getting better or worse?
In case of severe symptoms:
- Descend immediately! At least 500-1,000m
- Emergency! Inform guide
- Organize evacuation if necessary
My tip: Listen to your body! Headaches at 5,000m are normal - but if they get worse despite ibuprofen and rest, that's a warning sign. No summit is worth risking your health. I've seen too many climbers ignore their symptoms and then have to be evacuated.
Common mistakes (and how to avoid them)
Mistake 1: Too little acclimatization
Problem: Directly from the airport to the tour, only 1-2 days in La Paz.
Consequence: Altitude sickness, summit not reached.
Solution: At least 3-4 days in La Paz, do an acclimatization hike.
Mistake 2: Luggage too heavy on day 2
Problem: Carry 20kg backpack from base camp to high camp.
Consequence: Completely exhausted on summit day, no energy left.
Solution: Book porters (20 USD), save energy for the summit.
Mistake 3: Too fast a pace
Problem: Try to keep up with the guide, walk fast.
Consequence: Overexertion, altitude sickness, turning back.
Solution: Go slowly! "Pole pole" (Swahili for "slowly slowly"). Breathing is more important than speed.
Mistake 4: Drinking too little
Problem: Only 1-2 liters of water per day.
Consequence: Dehydration worsens altitude sickness.
Solution: Drink 4-5 liters per day, even if you are not thirsty.
Mistake 5: Wrong clothing
Problem: Gloves that are too thin, no down jacket, cotton T-shirts.
Consequence: Frostbite, hypothermia, reversal.
Solution: Invest in good equipment! Functional clothing, warm gloves, down jacket.
Safety: Is Huayna Potosí dangerous?
Yes and no. Huayna Potosí is technically easy, but the altitude makes it dangerous.
Main hazards:
- Altitude sickness:** Can be fatal if ignored
- Cold and frostbite:** -20°C + wind = -40°C felt
- Crevasses:** Present, but rarely a problem on the normal route
- Avalanches:** Risk increases after sunrise (therefore early start)
- Exhaustion:** Leads to mistakes and accidents
Fatalities:
Yes, there have been fatalities on Huayna Potosí - but they are rare. Most accidents happen because of:
- Ignoring altitude sickness symptoms
- Bad weather (storm, whiteout)
- Inexperienced guides
- Fatigue and mistakes on the descent
How to stay safe:
- Acclimatize properly
- Book an experienced guide
- Listen to your body
- Turn around if necessary
- Concentrate on the descent (most accidents happen on the descent!)
My tip: Your guide is your life insurance. Listen to him! If he says "We're turning around", then turn around. If he says "Slow down", then slow down. Guides know the dangers and have years of experience. Trust them.
Best time to go: When should you go?
Dry season (May-September): Best time
May: Transition month, few tourists, good weather, still a little warmer
June-August: Peak season, best weather, but cold (down to -25°C at night)
September: Perfect! Warmer than June-August, fewer tourists, stable weather
Rainy season (October-April): Possible, but more difficult
October: Transition month, still okay, first rains
November-April: rainy season, more snow, worse weather, higher avalanche risk
My tip: September is the best month! The weather is still stable, but it is warmer than in midsummer (June-August) and there are fewer tourists. I organize most tours in September.
Conclusion: Is Huayna Potosí right for you?
Huayna Potosí is the perfect introduction to high-altitude mountaineering - if you are well prepared.
You should climb Huayna Potosí if:
- You want to do your first 6,000 meter peak
- You have a good basic level of fitness (regular exercise, hiking experience)
- You are prepared to allow 3-4 days for acclimatization
- You respect the altitude and cold
- You are up for a real adventure
You should NOT go if:
- You don't have time for acclimatization (less than 3 days)
- You have health problems (heart, lungs, high blood pressure)
- You have no altitude experience and do not know how your body will react
- You are not prepared to turn back if necessary
As a German-speaking guide who has been leading climbers up the Huayna Potosí for years, I can tell you: this mountain is doable - but don't underestimate it. The altitude is brutal, the cold is extreme and the summit day is one of the toughest days you will ever experience.
But when you make it, when you stand at 6,088m and see the Cordillera Real below you, when the sun rises and the peaks glow golden - then you know why you did it. The feeling is indescribable.
Prepare well, acclimatize properly, listen to your body and you will make it. The Huayna Potosí is waiting for you!
**Ready for your first 6,000 meter peak? Let's plan your ascent of Huayna Potosí in 2026!
Ready for your Bolivia adventure?
Let's plan your perfect private tour together!
Share Article
You might also like
Bolivia Trekking 2026: The 10 Best Hikes – Difficulty Levels & Tips
Bolivia trekking without preparation often ends with altitude sickness or the wrong route. The best hikes for every fitness level – with difficulty, duration & costs.
Bolivia Altitude Sickness: Symptoms, Prevention & What Really Helps [2026]
Altitude sickness ruins one in three Bolivia trips. This guide shows you how to really avoid headaches, dizziness and worse at 3,600-6,000m.